
Today, we jump right into the step x step of how you can easily get started tying wet flies. The videos that follow will walk you through the basics of tying a wet fly.
In the last Module 3, you should have worked through the basics of tying your first nymph fly pattern. Click here if you missed Module 3.
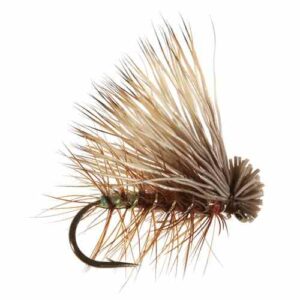
You should also have ordered and received your materials for this week’s fly – the Soft Hackle.
If you still have questions this week, you can connect with me directly here. Just let me know what you are struggling with.
Now we’re ready to jump into this weeks content.
We’ll be covering wet flies today as we focus on one of the best an easiest patterns of all, the soft hackle. We will also talk about using peacock, tying with floss, secondary tools.
I’ve also got two great bonus podcasts with the king of wet flies, Davy Wotton (See Chapter 5).
Table of Contents – Tying Wet Flies for Trout
Chapter 1: Review and Introduction to Module 4
Chapter 2: Securing Peacock
Chapter 3: Tying with Floss
Chapter 4: Fly Tying Tools
Chapter 5: Whip Finish Tool
Chapter 6: Davy Wotton Bonus Podcasts
Chapter 7: Action Item Video for Module 4
Chapter 8: Fly Materials for Next Weeks Fly
Chapter 9: Conclusion
Ch. 1 – Wet Flies for Trout – Review and Introduction
Watch this introductory video #31 before moving on:
Last week you should have worked on tying the pheasant tail nymph. You should understand a little about adding weight, beads and flash.
The pheasant tail is one of the greatest nymphs in the world. There are many variations but you can’t go wrong with the basic fly you learned last week. Here’s a great video on tying another version of the P. Tail Nymph.
If you didn’t complete Week 3 yet, just click here and you can get caught up.
You should also have ordered and received your materials for this weeks fly – the Soft Hackle wet fly.
If you still have questions this week, you can connect with me directly here.
I would love to hear what your biggest struggle was this week. Please click here and send me an email with “fly tying struggle” in the subject line.
I’ll be covering wet flies today and tying the soft hackle wet fly. A killer patter that is fairly simple.
Before we jump into my video series today, I want you to watch one of the great fly tyers online. Davie McPhail shows us how to tie a wet fly here:
Today I’ll also cover the whip finish tool, using floss, secondary tools and a few other tips and tricks plus some bonus videos from outside of the Wet Fly Swing Universe.
Here’s what to do moving forward – Watch Videos 31 through 34 first. Then watch video 35 and follow along to tie the soft hackle.
Ch. 2 – Securing Peacock Material
watch this video #32 before moving on:
Peacock is amazing material but it can be a little fragile at times after a few fish bite into it. There is a quick way to strengthen the peacock which I demonstrate in the video above.
You use a lead thread to twist into the peacock and then wrap your body material.
This adds a huge amount of support to the fly. We also talked about counter wrapping in a previous module.
Counter wrapping works well with copper wire but we won’t be using wire today. After watching the video you should understand a quick way to strengthen your boy material.
Before moving on, I wanted to add a bonus video from Davie on using peacock here:
Ch. 3 – Using Floss for the Body
watch this video #33 before moving on:
There are a bunch of great flies that use floss for the body. But, floss isn’t always the easiest material to work with.
The video shows you a few tips when using floss.
One of the biggest struggles is the tendency for the floss to split and fray. One tip is to twist it as you go.
Another tip is to start wrapping at the front and then wrap to the back and front again. This covers some of the imperfections.
I’ll talk about a few Secondary tools you might need in the next video.
Before we jump into the next chapter in this section I wanted to share a great video that digs a little deeper into using floss and the terminology that goes with it:
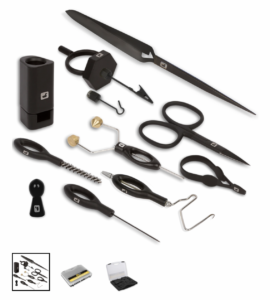
Ch. 4 – Fly Tying Tools – Secondary
watch this video #34 before moving on:
When we first started this course I didn’t want to bog you down with a bunch of extra things that weren’t required.
Now that you are a little further into the course and have a few flies under your belt, I wanted to touch base on other tools.
You don’t have to go out and get all of these this week but want to remind you of a few extras.
Three we didn’t talk about are an extra pair of scissors, tweezers and a comb or brush whip finish tool, and dubbing tool.
Bigger items like portable kits, a tying desks, lights and magnifiers can also be a big help.
Additional Fly Tying Tools:
- Extra scissors
- tweezers
- comb
- brush
- whip finish tool
- dubbling tool
- tying desk
- Magnifyer
The guys at Fly Fish Food have a a bunch more tools and tutorials here:
You can also Loon’s fly tying tools kit at Fly Fish Food here:
Next, I’ll show you how to use the whip finish tool even though I like using my hands and not a tool just like I show here!
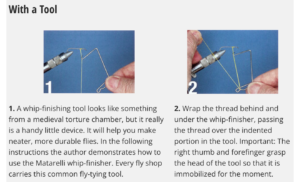
Ch. 5 – Whip Finish Tool
watch this video #35 before moving on:
We glossed over this at the beginning because I wanted to show you how to do a whip finish with your hands as I noted above.
One thing I learned from my dad a long time ago is to start with the best tool of all, Your hands. If you find an actual tool that works better then try it out.
It saves time and money and clutter. But, I think some people will like to use the tool so I show you how in the video above.
MidCurrent walks us through the whip finish tool and without the tool by text in the blog post below:
In Chapter 7 we get into the good stuff and focus on tying the soft hackle from start to finish.
But first I wanted to share a couple of huge podcast episodes we had with one of the best wet fly fisherman in the world, Davie Wotton. Let’s take a listen……….
Ch. 6 – Davie Wotton Wet Fly Podcast Bonuses
I had the great privilege to interview Davie Wotton twice on the Wet Fly Swing Podcast. Take a listen to these episodes below:
Davie Wotton in episode #35 – Wet Fly Fishing:
Davie Wotton in episode #174: Top Wet Fly Patterns
If we missed anything in those podcast episodes leave a comment at the bottom of this post and we’ll do another!
Now, for your Action Item for the week.
Ch. 7 – Your Fly Tying Action Item of the Week
Watch video #36 and tie the Soft Hackle before moving on:
Follow the step by step video above to tie the soft hackle. Click here if you have a major hangup so I can coach you through. We offer a second method for securing the peacock in this video using very thin copper wire. By counter wrapping the wire over the peacock hearl we secure it.
In the episode above I shared a wet fly without a wing but in contrast winged wet flies may be considered a more traditional style. Here is another video from Davie McPhail this time with a winged we fly:
Ch. 8 – Fly Materials for Next Weeks Dry Fly
Watch video #37 on materials before moving on:
We will be moving into Dry Flies next and starting with the Elk Hair Caddis. You need to get the materials this week.
Your fly materials for the Elk Hair Caddis next week:
Dubbing: Click on this link to get a dubbing box (includes cream)
Brown Dry Fly Hackle: Click on this link to get a dry fly neck.
Elk Hair: Click this link to get a patch of Elk Hair.
Hooks: Click on this link to get size #14 dry fly hooks.
Ch. 9 – Conclusion
Watch video #38 before moving on:
I review the what we covered this week and your action items to get completed before moving into the next Module #5.
In module 5 we will begin to dig into dry flies with the elk hair caddis.
ACTION ITEMS FOR THE WEEK
- Watch videos #31 through #36 in this module
- Follow each video step by step to prepare for the soft hackle.
- Watch video #36, and tie your fly as we go.
- Note any major struggles you are having.
- Tie at least 12 soft hackles this week.
- Send me an email here with a list of struggles you had and attach a photo of your completed pheasant tail pattern.
- Purchase the Elk Hair Caddis materials for next weeks fly pattern at the links above.
- For a free personalized coaching call, click here and I’ll help you through your struggles this week.
Click on the links below if you need to get caught up:
Fly Tying Course: Week 4 (Current)
Click here to Start the Next Module #5


